
After Googling Cozmo OpenCV I came up with very limited examples. The few top results for Cozmo OpenCV that actually covered some code, and didn’t just mention it, used a bunch of self.stuff. I wanted to make a simpler OpenCV example for the Anki Cozmo SDK in Python for Python Beginners such as some of our STEM students.
This post will assume you know how to install OpenCV. In case you don’t, keep checking back. I will probably be writing a tutorial on installing OpenCV before too long.
In this particular example in Cozmo OpenCV, we’ll be looking at Thresholding.
Here is more on the Anki Cozmo SDK.
Looking to do the same thing with Vector? Check out the Anki Vector SDK.
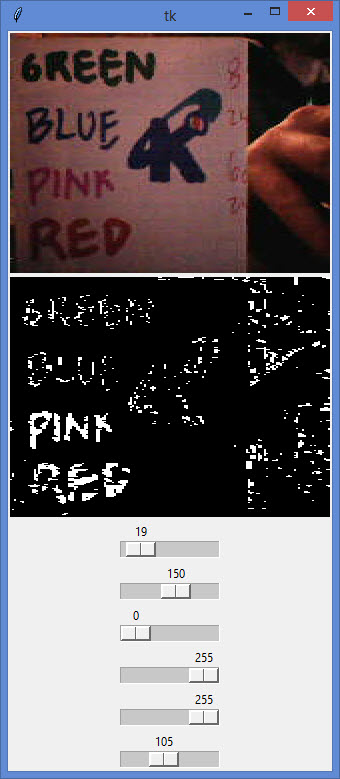
Cozmo OpenCV – Thresholding
# -*- coding: utf-8 -*-
"""
Created on Mon Feb 12 15:51:30 2018
Copyright Kinvert All Rights Reserved
If you would like to use this code for
business or education please contact
us for permission at:
www.kinvert.com/

@author: Keith
"""

import asyncio
import cozmo
import PIL.Image
import PIL.ImageFont
import PIL.ImageTk
import cv2 as cv
from scipy.interpolate import UnivariateSpline
import numpy as np
import tkinter as tk
import sys

class Thresh:
    def __init__(self):
        self._robot = None
        self._tk_root = 0
        self._tk_label_input = 0
        self._tk_label_output = 0
        cozmo.connect(self.run)

    def on_img(self, event, *, image:cozmo.world.CameraImage, **kw):

        raw_img = image.raw_image

        raw_rgb = np.array(raw_img)

        r, g, b = cv.split(raw_rgb)

        hsv_img = cv.cvtColor(np.array(raw_img), cv.COLOR_RGB2HSV)

        h, s, v = cv.split(hsv_img)

        mer_img = cv.merge((h, s, v))

        hsv_img = mer_img

        rgb_img2 = cv.cvtColor(hsv_img, cv.COLOR_HSV2RGB)

        invGamma = 1.0 / ((self._tk_ga_scale.get()+1) / 50 )
        new = np.zeros(256)
        ori = np.zeros(256)
        for i in range(256):
            new[i] = ((i / 255.0) ** invGamma) * 255
            ori[i] = i
        try:
            incr_ch_lut = self.create_LUT_8UC1(ori, new)
            low = np.array([self._tk_hl_scale.get(),self._tk_sl_scale.get(),self._tk_vl_scale.get()], dtype="uint8")
        except:
            sys.exit('Window Closed - Exiting')
        high = np.array([self._tk_hh_scale.get(),self._tk_sh_scale.get(),self._tk_vh_scale.get()], dtype="uint8")

        rgb_img = cv.LUT(raw_rgb, incr_ch_lut).astype(np.uint8)
        rgb_img2 = cv.LUT(rgb_img2, incr_ch_lut).astype(np.uint8)

        rgb_img = cv.blur(rgb_img,(3,3))

        thresh_img = cv.inRange(rgb_img2, low, high )

        raw_rgb_conv=cv.cvtColor(np.array(raw_img), cv.COLOR_BGR2RGB)
        rgb_img_conv=cv.cvtColor(np.array(rgb_img), cv.COLOR_BGR2RGB)
        rgb_img2_conv=cv.cvtColor(np.array(rgb_img2), cv.COLOR_BGR2RGB)
        cv.imwrite('raw_img.png', raw_rgb_conv)
        cv.imwrite('rgb_img.png', rgb_img_conv)
        cv.imwrite('rgb_img2.png', rgb_img2_conv)

        pil_thresh = PIL.Image.fromarray(cv.cvtColor(thresh_img, cv.COLOR_GRAY2RGB))
        rgb_img = PIL.Image.fromarray(rgb_img)
        rgb_img2 = PIL.Image.fromarray(rgb_img2)


        display_image_input = PIL.ImageTk.PhotoImage(image=pil_thresh)
        display_image_output = PIL.ImageTk.PhotoImage(image=rgb_img2)
        self._tk_label_input.imgtk = display_image_input
        self._tk_label_input.configure(image=display_image_input)
        self._tk_label_output.imgtk = display_image_output
        self._tk_label_output.configure(image=display_image_output)
        self._tk_root.update()


    def create_LUT_8UC1(self, x, y):
        spl = UnivariateSpline(x, y)
        return spl(range(256))

    async def set_up_cozmo(self, coz_conn):
        asyncio.set_event_loop(coz_conn._loop)
        self._robot = await coz_conn.wait_for_robot()
        self._robot.camera.image_stream_enabled = True
        self._robot.camera.color_image_enabled = True
        self._robot.add_event_handler(cozmo.world.EvtNewCameraImage, self.on_img)
        self._robot.set_head_angle(cozmo.util.Angle(degrees=0))

    async def run(self, coz_conn):
        await self.set_up_cozmo(coz_conn)

        self._tk_root = tk.Tk()
        self._tk_label_input = tk.Label(self._tk_root)
        self._tk_label_output = tk.Label(self._tk_root)
        self._tk_ga_scale = tk.Scale(self._tk_root, from_=0, to=255, orient=tk.HORIZONTAL, length=300, label='ga')
        self._tk_hl_scale = tk.Scale(self._tk_root, from_=0, to=255, orient=tk.HORIZONTAL, length=300, label='hl')
        self._tk_sl_scale = tk.Scale(self._tk_root, from_=0, to=255, orient=tk.HORIZONTAL, length=300, label='sl')
        self._tk_vl_scale = tk.Scale(self._tk_root, from_=0, to=255, orient=tk.HORIZONTAL, length=300, label='vl')
        self._tk_hh_scale = tk.Scale(self._tk_root, from_=0, to=255, orient=tk.HORIZONTAL, length=300, label='hh')
        self._tk_sh_scale = tk.Scale(self._tk_root, from_=0, to=255, orient=tk.HORIZONTAL, length=300, label='sh')
        self._tk_vh_scale = tk.Scale(self._tk_root, from_=0, to=255, orient=tk.HORIZONTAL, length=300, label='vh')
        self._tk_label_input.pack()
        self._tk_label_output.pack()
        self._tk_ga_scale.pack()
        self._tk_hl_scale.pack()
        self._tk_sl_scale.pack()
        self._tk_vl_scale.pack()
        self._tk_hh_scale.pack()
        self._tk_sh_scale.pack()
        self._tk_vh_scale.pack()

        while True:
            await asyncio.sleep(0)


if __name__ == '__main__':
    Thresh()
Cozmo OpenCV – How the Python Code Works
We are making some pretty standard imports here. Obviously we need both Cozmo and OpenCV (cv2). Other notable imports are numpy, PIL, and tkinter.
We are using numpy to handle arrays. Feel free to import numpy as np.
tkinter is here for window management and to allow sliders etc.
PIL is handling the images and is required to work with Cozmo’s images from the camera.
I am seeing if the event has been flagged, and we have gotten an image from Cozmo. If so, we bring in that image and switch it to HSV colorspace using OpenCV. We update the thresholding high and low according to the sliders.
We save the original and hsv images to make sure we’re getting a good original image and able to edit it. This helped for debugging purposes.
We do the thresholding using OpenCV’s inRange function, passing it the oringinal image, as well as the high and low thresholding numpy arrays.
The last bit is displaying the images in the window we created using tkinter.
Cozmo OpenCV – Conclusion
I will get Syntax Highlighting working when I can.
The Anki Cozmo is a great tool for teaching kids STEM. We recommend it as an Educational STEM Gift for Kids. There are many more applications for Cozmo and OpenCV. Thresholding is just the tip of the iceberg. We will get more content up soon and update this article. I just wanted to get something out there since there are barely any good results out there when Googling Cozmo OpenCV.
I hope to get in to more of this in depth in the future. The main thing was getting at least something up there and building off it. The main article to watch is our article on the Anki Cozmo SDK in Python.
Cozmo Examples, Tutorials, and Projects for K-12 STEM Education Curriculum